Showing posts with label bookbinding. Show all posts

29/12/2024

New notebook

New baby!  327g. 

Working with such a thickness took me a few days of adjusting details. A few imperfections, more than usual. I had to do some parts of the process in two steps. But I reached the goal of much bigger spine compared with the pages (+29%). This will help to balance the thickness once the notebook is eating notes, experiences and sticked alien stuff. The pages will get about 54% bigger. Now it looks a little ugly in his initial trapezoidal shape.

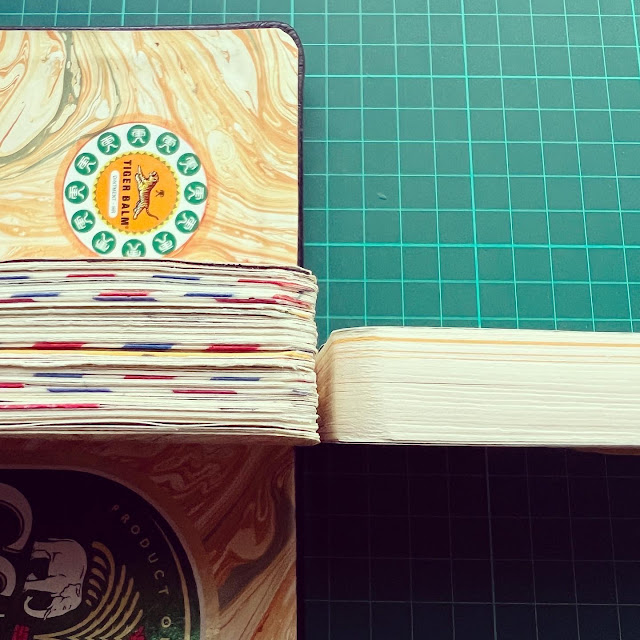
Some photos show it together with his great grandfather (n-4) notebook. New one will be 21% thicker than it when finished!

A fat notebook has some problems I experienced before: It’s heavier to carry, difficult to write near the edges and higher risk if it’s lost/stolen when travelling since there are many more memories and hours of work. Of course I can’t call it “pocket” anymore. However the final shape is magnificent, and this only point makes up for everything before. At least I think so now. Maybe myself from the future will think different but anyways he has the duty to carry it and finish it from now on.

19/02/2024

Notebook getting fat

Comparison between the new notebook and the previous one. Both 180 pages, paper 100g/m2.

After using it and pasting things on the pages it becomes 63% thicker! From 13mm new to 21mm finished.

Is there any method for balance this when bookbinding? In the past I tried to add extra gap in the spine, between the signatures and the cover. It doesn’t help much. Another solution is to cut some pages in the middle (same as some photo albums) but it’s not aesthetic and definitely destroys the spreads.

Next notebook, coming really soon, I will try a thicker thread and even signatures with less sheets of paper to increase the thickness in the sewing area.

Anyways the spine will always keep the same thickness and cover will bend lightly. I really like that shape. So even for that 63% or lower, it manages to get great final feeling.


26/11/2020

Lovely pastedowns

Styles of pastedown used in my last notebooks. This is a magic thing which adds personality and style to the whole journal. 

I specially like the chosen one for The Nautilus Manuscript (left up in brown tones). I’m considering using a flat color next time.
Well, I finally used a yellow color for my new handmade notebook. I will post it soon.

08/12/2019

The Nautilus Manuscript for sale


The goal of this notebook is to reproduce my journals in a way people from all the world can have them in their hands and feel the same touch, size, cover and paper than the originals.

Tittle: The Nautilus Manuscript / El manuscrito Nautilus
Size: 14 x 9 x 2,5 cm
Number of pages: 208
Paper: Vergè (laid) 100g/m2
Cover: Hard, black color and real leather
Bookbinding: Bound by hand

Produced in small batches. Check availability before placing an order.


Price: 325 EUR
AVAILABLE


Each copy is numbered and signed.
International certified shipping included.
IVA/VAT included in the price, when applied (inside European Union).
Shippings to worldwide.


How to order:

There are 3 ways:

1. Email me to naranjacorreo@gmail.com to place an order. Worldwide shipping from Spain.

2. 🇺🇸 USA customers can also buy directly here:
Amarillo Stationery is an online shop based in USA. 
You can pay directly in USD. Domestic shipping from Chicago.


3. 🇯🇵 For Japan customers can also buy directly here:


Wanderlust is an online shop based in Japan.
You can pay directly in JPY. Domestic shipping from Japan.


A few years after the release of The Orange Manuscript my second published notebook is now a reality.

A very personal project made with pleasure and full passion. Countless iterations to take care of every detail extended the process a lot of time. But it was worth, finally. 


When I was offered to publish it under a few of those "top publishing houses" I thought this would save me a lot of manufacturing work and headaches. However industrial process can't guarantee valuable details and accuracy. Mass production often kills the essence and that's exactly the key in this case.

Therefore I decided the production to remain full manual. This is time consuming and brings much higher costs and headaches but the result keeps the soul of my original notebooks. As I always say, making your own notebooks adds a unique and special feeling and link.

I found a small workshop with good professionals who take care of the bookbinding process, specially working with the laborious leather cover. Slow method but worth.


As for the printing I did numerous tests. I chose the best of the best and the print quality shocked me every time I see closely. Really magic! Thanks to the experimented good man from the printer who helped me a lot to manage some main guidelines in the beginning.


And the new baby is THICK.


The Nautilus Manuscript is facsimile, a replica which collects copies of my written pages from 2015 to 2019. Notes, ideas, memories, experiences and difficult to catalog stuff fill the pages. Many of these spreads can be seen in the draft or finished along my posts in Instagram. It's written mostly in Spanish and some pages in English. All full visual.

Here an overview of all the pages together and some samples:


I'm so happy to complete this personal project and now I can share it with the world.
Many thanks for reading.


Extra! @skybambi recorded this nice video flipping pages when she received her copy. 
You can watch it full here: https://www.instagram.com/p/CWyVTIUhu8M/
Or bellow in 5 parts:


26/01/2019

Habemus new notebook!

Starting new notebook with new year, more or less, which is a coincidence since I just start a new one with the old one is completed.

This time I wanted to go one step further and use as archival quality materials as possible. That means changing inks, paper and maybe leather cover.

I found new waterproof (and other magic properties) inks keeping the same colors and I show them in another post.

I tested quite a few high quality papers from a specialist shop. All laid papers in cream color and I fell in love with one of them called Burga because its texture and feeling. However it can't resist the eraser without breaking the external layer of papel so easily. A huge shock after I already bought quite a lot quantity. Conclusion: I continue using my trust Galgo paper 100g/m2 again.

The thickness is much more moderated than the former one, which became quite fat. Actually it's not "pocket" anymore so I decided to make something more portable. There is also a more important reason: Last notebook took me 2 years and I felt some risk when carrying it in my bag during some travels specially in dangerous areas. It could be a big lost if something happened to it. Shortening the time of use also reduce that risk.

I also used the same black leather. The cardboard now is stronger.

New adventures ahead for this baby.


22/02/2016

The importance of making your own notebook


I've imagined many times my dream notebook. Too much thinking but doing nothing. However I had clear each detail in my mind: Size, thickness, leather cover, verge paper, full flat when open, etc.

Some reasons to encourage you to do your own notebook:

1. It's the only way to have it as you want. It's almost impossible to find your perfect notebook in a shop. Fortunately nowadays stores shows plenty of books with a number of brands never seen before. Most of them contain paper with non acceptable quality. If you like the paper but maybe not the cover, you get it and time later you realize it's not your perfect jewel because you see only the mistakes.

2. It's made with love. No industrial process. Everything takes energy and it's not the same if it was been created by a salaryman without any care than done with your own hands with passion. See how bookbinding is done here: http://josenaranja.blogspot.com.es/2015/07/about-bookbinding.html

3. A strong link is created with your notebook. This is the key. A mystical relation which will boost the creativity and will appear in each letter and drawing. Fountain pens note these details, you know, right?

The result can only be a beauty because it's in touch with reality.

08/08/2015

About bookbinding: Additional information about sewing

In a previous post I explained how to do you own notebook. Detail about the way of sewing was missing there and it's shown here:

Bound pages after sewing.
Remember that practicing and singing improve the result.

07/07/2015

About bookbinding


You don’t need to be a professional in bookbinding to make a great quality notebook.

Maybe the first test doesn’t reach a perfect result but you will be surprised how easy the improvement goes and how fast the mistakes are solved. After two or three notebooks done there is not room for bad quality. Excellence is the goal, not perfection. Perfection is impossible and it’s not welcome in a handmade artwork.

The  notebook made by yourself offers a higher level of satisfaction than any other. You add the passion and love for it, your favorite paper and details. You add a part of yourself in it. Unfortunately it’s not possible get that from the shops, where an industrial notebook is done by a bored worker, probably Chinese or robot, who is paid per hours and produces hundreds of them every day. Your dear and loved notebook is just one more. On top of that the quality standards in the notebooks paper used to be poor nowadays. Endless variety of brands and styles, more than ever, with poor quality. And expensive. Only about 15 sheets of paper are needed to fill a pocket notebook, which is less than 1 EUR even for high quality paper.

Bookbinding is an old technique and there are many methods. I’m showing here how to fill a Moleskine notebook with your favorite paper, that’s what I use in my last notebooks and was a clear milestone in my journals evolution. You can also make the cover in real leather, which is even easier. I will show that in a separated post.

Bookbinding is a relaxing task. Bookbinding is perfect for meditation.

1.) Materials:

-Moleskine cover.
-Good quality paper.
-Scissors.
-Cutter.
-Ruler.
-Thread and needle.
-Adhesive for bookbinding (elastic, neutral PH if possible)
-Cotton fabric for bookbinding (used over the spine)
-Papersand

2.) Folding the sheets. Cut the A4 sheets in A5 size. Only 15 sheets A4 from 100g/m2 paper are enough for a Moleskine pocket. Fold them and make groups of 3 sheets each. Press them properly.

3.) Binding. Perform 5 holes with a needle and a template. Sew applying the method you like.

The easy method I apply will be explained in a next post.

 
 4.) Paste the stack. Press the sheets in order to apply glue only on the edges. Set the cotton fabric and apply more glue. Release the stack and paste the wings of the fabrics to the paper. This will avoid tiny clearances between the sewn sheets.

Keep the stack under weight for a time while become dry to keep the paper full flat.

 
5.) Cutting the paper. Cut the edge of the stack to fix into Moleskine dimensions. Use the sandpaper to shape the corners.

6.) Remove the paper. Kill the Moleskine. Do not suffer or produce too much tears. Cut the paper from the second pasted pages (front and rear part of the notebook). Reuse the register tape and glue it in the new paper.

 
7.) Insert the new paper. Paste the stack made with the new paper into the cover. Apply glue only on a small area of the external sheets, not in the edge.

Voilá! New notebook is ready for all kind of inks.

8.) Extra. When the notebook is complete is good idea to add a few more details like a stylish paper in the first pages or an acid-free tissue paper pocket for better conservation when being stored.